

The test editor
Open a test from Test Cases to edit it.
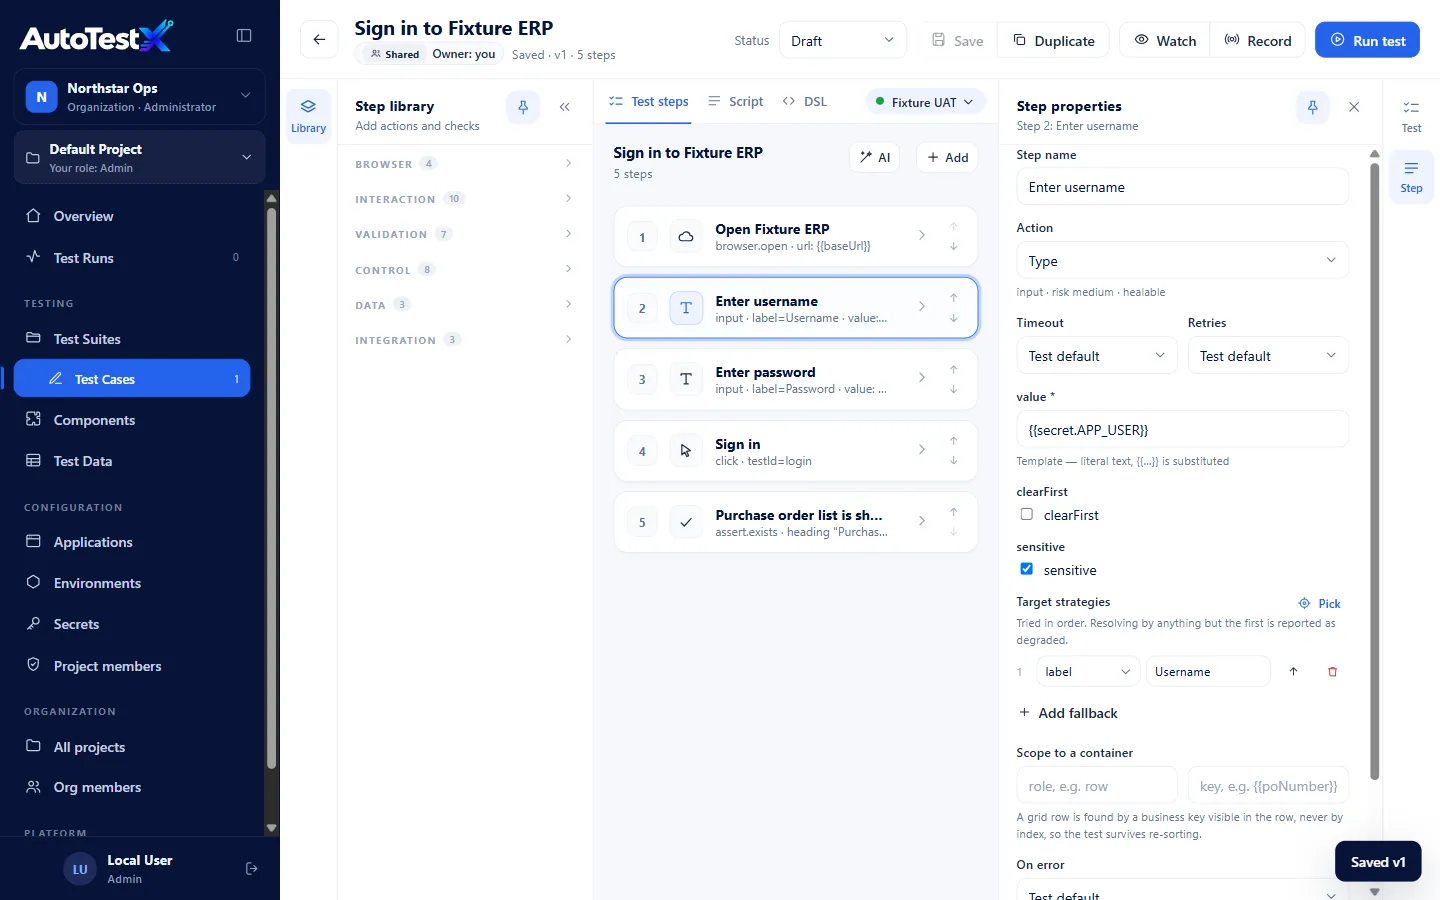
Layout
Section titled “Layout”| Area | What it holds |
|---|---|
| Toolbar (top) | Back arrow, test name (click to rename), owner and visibility chip, save state (Saved · v3 or Unsaved changes), Status, Save, Duplicate, Watch, Record, Run test |
| Step library (left) | Every available action, by category. Click one to add it. Pin it open or minimize it. |
| Centre | Three tabs: Test steps, Script, DSL, plus the environment selector |
| Side panel (right) | Test settings or Step properties. Toggle it with the Test / Step rail on the far right. Pin it to keep it beside the steps. |
The editor needs a reasonably wide window. On narrow screens the library and side panel slide over the steps instead of sitting beside them.
Adding steps
Section titled “Adding steps”There are five ways to add steps:
- Add step (Add above the steps). Search by name, summary or type (e.g.
type,assert.text,wait) and choose an action. - Step library. Expand a category and click an action.
- Insert line. Hover between two steps and use the + to insert exactly there.
- Record. Use the application in a real browser and get the steps.
- Write with AI. Describe the steps in plain language.
Where a new step goes:
- With nothing selected, at the end.
- With a step selected, right after it.
- With a block step selected (If / Else, For each, Repeat, While, Lookup), inside it.
The new step’s properties open so you can fill it in.
The step categories
Section titled “The step categories”| Category | Actions |
|---|---|
| Browser | Open, Back, Forward, Refresh |
| Interaction | Click, Double click, Type, Clear, Select, Check, Upload file, Hover, Press key, Lookup |
| Validation | Exists, Visible, Text, Value, Attribute, URL, Expression |
| Control | Wait, Wait for element, Wait for network, Screenshot, If / Else, For each, Repeat, While |
| Data | Extract, Set variable, Custom code |
| Integration | Call component, HTTP request, Poll API |
Every action and parameter is described in the step reference. The categories offered depend on the test’s engine (Web, Android, iOS). Some actions are web-only.
Arranging steps
Section titled “Arranging steps”- Select a step by clicking it. Click it again to open its properties.
- Reorder with the ↑ / ↓ arrows on the step. They only move a step among its siblings, never into or out of a block.
- Drag a step onto another to move it before that step. This can move steps into or out of blocks.
- Steps inside a block are indented under it. An If / Else shows its otherwise branch beneath the main branch.
Current limitations:
- An empty otherwise branch cannot be filled from the editor yet, because there is no step to insert or drop before.
- Cleanup steps (steps that always run at the end, pass or fail) are part of the test format but cannot be added in the editor.
For either one, write the test JSON and import it (see Importing).
Step properties
Section titled “Step properties”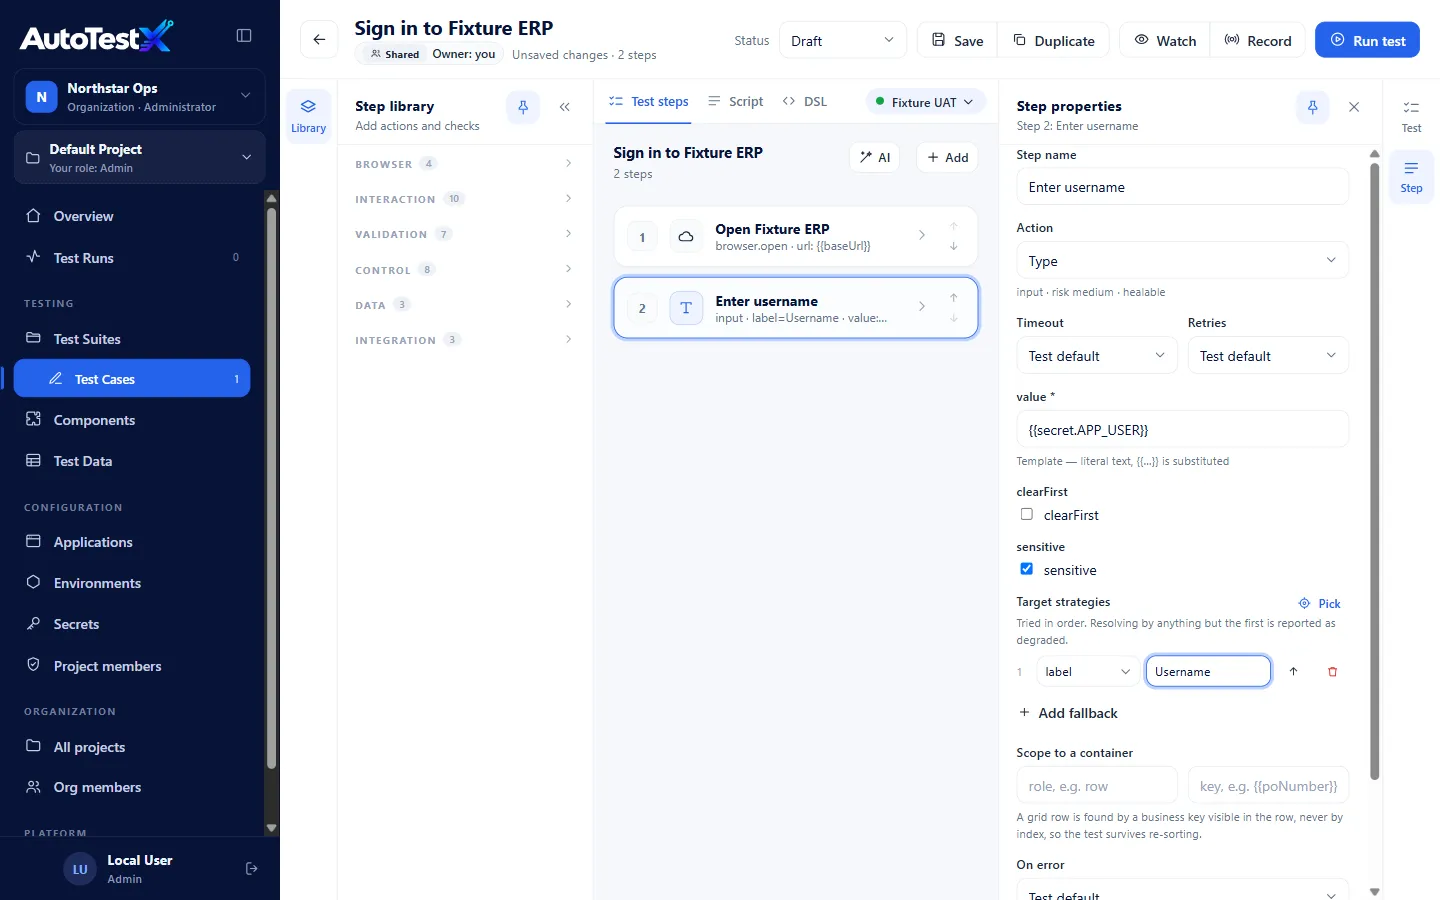
| Field | Meaning |
|---|---|
| Step name | The label shown in the editor and the run report. Leave it empty to use the action’s own summary. |
| Action | The step type. Changing it keeps the target if the new action needs one, and resets parameters that do not apply. |
| Timeout | How long the step may take: Test default, 15, 30, 45 or 60 seconds |
| Retries | Extra attempts if the step fails: Test default, No retry, 1, 2… |
| parameters | The action’s own fields, e.g. url, value, expected. A * marks required ones. Under each, a hint says how it is read: Template (literal text where {{…}} is substituted) or Expression (the whole field is one expression). See Expressions. |
| Target strategies | How to find the element (only for actions that act on one). See below. |
| Scope to a container | Restrict the search to a container, e.g. the grid row whose text contains the business key {{poNumber}} |
| On error | Test default, Abort (stop the test), Continue (record the failure and carry on), Ignore (warn only) |
| Soft assertion | Validation steps only. Record the failure, continue, and fail the run at the end. Ideal for checking many fields on one screen. |
| Skip this step | Keep the step but do not run it |
| Duplicate / Delete | Copy or remove the step |
Validation problems appear at the top of the panel, and a red dot appears on the Step rail button. The toolbar shows the total (· 2 errors). A test with errors cannot be saved.
How Timeout, Retries, On error and Soft assertion combine is explained in Error handling.
Targets
Section titled “Targets”Steps that act on an element (click, type, assert…) carry a target: an ordered list of strategies, each a different way to find the element.
- The first strategy is tried first. If it finds nothing, the next one is tried, and so on.
- When a later strategy succeeds, the step is reported degraded (a warning), so you know the first locator has stopped working.
- Add fallback adds another strategy. ↑ moves one up. The trash icon removes it.
- Pick opens the application in a browser so you can click the element; its locators are filled in for you. See Picking an element.
Strategy kinds: testId, role (+ accessible name), label, placeholder, altText,
title, text, css, xpath. When and why to use each is in
Element targets.
Test settings
Section titled “Test settings”Choose Test on the right-hand rail.
| Setting | Meaning |
|---|---|
| Suite | The suite this test belongs to |
| Description | Free text describing the test’s purpose |
| Data source | None — run once, or a source that runs the test once per row. See Data-driven testing. |
| Engine | Web, Android or iOS. Changing it re-checks every step against what that engine supports. |
| Default timeout | Timeout for steps that do not set their own (default 30 seconds) |
| Default retries | Retries for steps that do not set their own (default 0) |
| Default on error | Abort, Continue or Ignore (default Abort) |
| Test variables (JSON) | Values available to every step as {{name}}. A list here can drive a For each loop. |
| DSL version | The format version of this test (read-only) |
Example test variables:
{ "vendor": "Globex", "lines": [ { "item": "1234", "qty": "2" }, { "item": "5678", "qty": "1" } ]}The Script tab
Section titled “The Script tab”Script shows the test as numbered, readable sentences, for a reviewer who wants to know what the test does without opening every step. Click a line to select its step. It is generated from the steps and is read-only.
The DSL tab
Section titled “The DSL tab”DSL shows the canonical definition: the JSON that AutoTestX stores, versions and runs. Copy puts it on the clipboard, so you can save it as a file, run it with the CLI, or share it. The format is documented in Test file format.
Saving
Section titled “Saving”- Save or Ctrl+S saves your changes. A Draft is saved over its current version
(
v1staysv1). A new version number starts only with New revision. See Versions. - Nothing saves automatically. Leaving the page with unsaved changes asks first.
- Choosing a status other than Draft takes effect when you save. See Lifecycle.
- A Ready version is locked. The toolbar offers New revision instead of Save.
Running from the editor
Section titled “Running from the editor”- Choose the environment in the selector above the steps. It starts on the first environment in the project’s list, so check it before you run.
- Optionally turn on Watch to see the browser while it runs.
- Choose Run test.
If there are unsaved changes, you are asked whether to Run saved version or Save and run. A run always executes a saved version.
Results stream into the step list (PASS / FAIL on each step) and into Run result below it. See Running tests and reading reports.
Who can edit
Section titled “Who can edit”The editor is read-only (with a banner saying why) when:
- the test is Ready (start a new revision) or Deprecated (duplicate it), or
- your role does not allow editing this test. For example, a Tester can edit only tests they own. See People, roles and permissions.